

Assembly Instructions for the KS3 Freestanding Cobra Bag Kit
The assembly instructions below will help you to correctly set up the KS3 Cobra Bag Freestanding Kit.
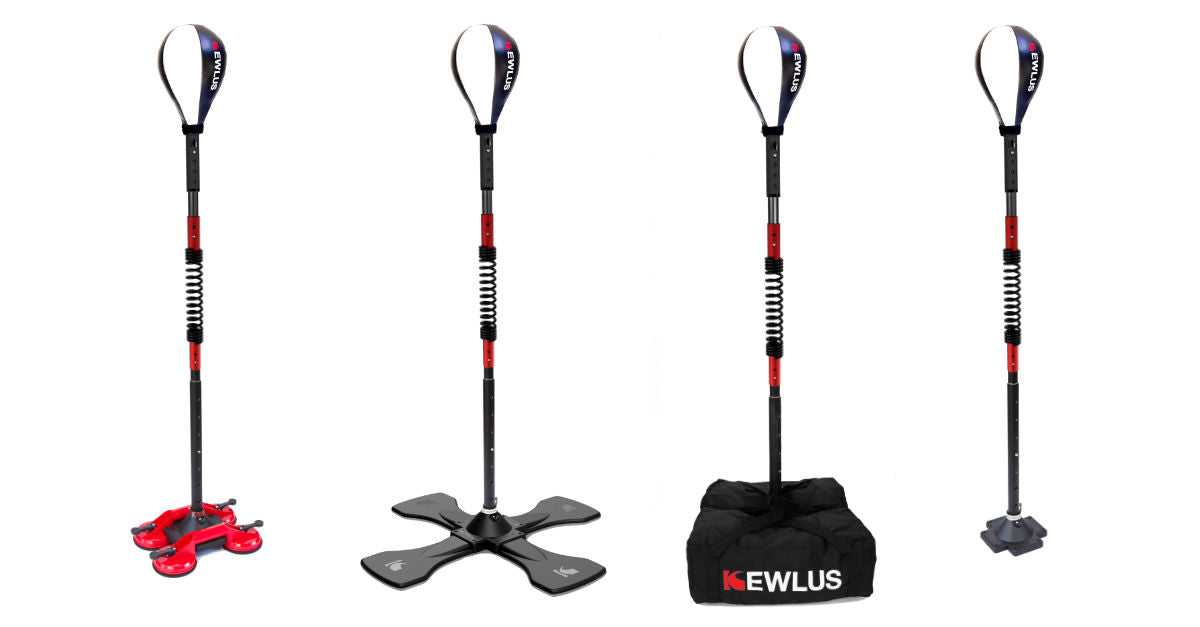
Step 1: Assemble the Paddles with the Base Connector
The first step is to assemble the Paddles with the Base Connector that will form the platform of your cobra bag. You'll need the following:
- Set of 4 Paddles, which come with a bag of 8 small black screws and a large chrome screw and nut;
- Base Connector, which comes with a steel hose clamp that fits around the collar of the Connector; and
- Your favourite Phillips screwdriver (not provided).
If the Mast is already in the Base Connector, pull it out by loosening the steel clamp around its collar, push both buttons with one hand while twisting and pulling the Mast out with the other hand. Tip: to make it easier, place the Base Connector on the floor and stand over it with your feet partly over the sides to hold it down. Remove the steel clamp completely and then use one hand to push the two buttons on either side while twisting and pulling the mast out with your other hand. If it feels too tight, you can use a screwdriver through one of the top holes of the Mast for leverage - just make sure to firmly push in the two buttons before twisting.

Holding the Base Connector upside down, plug two of the Paddles loosely into it. Thread the chrome nut partly onto the chrome screw and position it in the center of the Paddles with the screw head on the outside with the bolt on the inside. Plug in the third and the fourth Paddle, sliding each one in under the screw head. Push all the Paddles all the way into the cavity of the Base Connector and tighten the screw. To stop the nut from spinning until it finds grip, use your finger on the inside of the Connector to hold it. Video: https://youtu.be/KJ2Or8SlQGM.
Once the Paddles are in place with the chrome screw secured in the center, screw in the 8 black screws through the top of the Base Connector into the Paddles. Do not overtighten the screws - they should be hand tight but relatively flush with the top surface.
Step 2: Insert the Mast & Tighten The Steel Clamp

Place the platform on a tiled floor and insert the Mast into the Connector while pressing both of the push button. Push it all the way in and twist until the buttons pop out through the holes in the Connector. Top Tip: if the fit is very tight, use a screwdriver through one of the top holes as leverage.
Once the buttons pop out through the holes in the Connector and the Mast is firmly in place, place the steel clamp over the collar and tighten it. Make sure to tighten it as much as you can, but only by hand. Check that the Mast is nice and rigid. From time to time check the clamp around the collar to make sure it is tight. The rigidity of the Mast will have an impact on the performance of your cobra bag.
Step 3: Insert the Click Bar into the Mast
Insert one end of the Click Bar into the top of the Mast while pressing on the two buttons on the Click Bar. Slide it down until the buttons pop out through a pair of adjacent holes in the Mast. By selecting holes at different heights gives you height adjustment.
Step 4: Mount the KS3 Spring onto the Click Bar
Press in the two buttons at the top of the Click Bar and mount the KS3 Spring onto it. Slide the Spring onto Bar until the buttons pop out through a pair of adjacent holes in the red Spring connector.
There are two sets of holes, allowing you a further fine adjustment of height.
Step 5: Insert the Click Bar (or optional Red Bar) into the Top of the KS3 Spring
The KS3 Kits come with two Click Bars, the second one for the top section of the cobra bag. As an option you can get a Red Bar, which is about 3 inches shorter and slightly lighter. The Red Bar can be used in the top section of the bag in place of the Click Bar. The Red Bar allows you to make the top section shorter and lighter, resulting in a faster rebound. The Click Bar on the other hand might be slightly slower, but allows for greater reach.
Swapping from using the Click Bar in the top section to the Red Bar can offer you greater variety in your reflex training.
Step 6: Assemble the Target Ball & Adapter
Open the Velcro strap at the opening of the ball and unzip the opening all the way, revealing the bladder and the protective tongue. The tongue is there to reinforce the zip. The tongue is designed to lay flat between the diaphragm of the adapter and the zip, so pull the tongue out as you insert the adapter. Make sure that the bladder is sitting inside the diaphragm of the adapter and that the tongue is on the outside, just under the zip.
Note, that it is quite a tight fit, so you will need to push in the outer edge of the Adapter diaphragm with your thumb, while slowly working your way around until the whole diaphragm is in.
Once it's all in, adjust it so the tongue is on the outside of the diaphragm and then pull the zip as far as it will go. Note, in some targets like the Prime Target the zipper might not go all the way down - and to prevent the clasp from sliding up I recommend taping the bottom with electrical tape.
Using a ball pump (not provided) with a wet needle, inflate the ball to about half way and feel around by squeezing the ball to make sure that the bladder is where it should be in the center and not caught on the edge of the diaphragm. Do not twist the adapter as it may twist the bladder inside. Once you're satisfied that nothing is caught or twisted, inflate the ball fully until it is nice and firm. It should be firm, but not rock hard - it's important not to over-inflate it.
You can now mount the adapter with the ball on it onto the top section of your cobra bag. The Adapter has a number of hole pairs in the stem for adjusting the reach of your bag. There are also two hole pairs at the top end of the KS3 Spring just like at the bottom for fine adjustment of the reach length.
Step 7: Fill your Sandbags to Weigh Down Your Cobra Bag
The cobra bag will perform best if the base platform is properly weighed down. I have designed each sandbag to weigh roughly 45 pounds (20kg) when filled with sand. I strongly recommend lining the inside of each sandbag with a large, heavy duty bin liner bag to prevent the sand from seeping through the stitched seams.
As you fill the bags with sand, push the sand out to the far corners and try to make sure you fill the bags all the way to the top. Once the bags are filled to the very top and are slightly bulgy, tie off the liner bags loosely and close the Velcro shutters.

Place one bag onto two of the Paddles right up next to the Mast and Velcro the handle traps around the Mast. This will prevent the bag from sliding off during training. Do the same with the other bag on the opposite side.
Top Tip: more weight is always better. Increasing the weight adds to performance. One way to increase weight is to add a second set of sandbags on top of the first. You could also use wet sand to make each bag about 20% heavier. The combined weight should be at least 90-100 pounds for solid performance.

Optimum Tip: Using Olympic weight plates on top of the sandbags is another great way to increase not only weight, but also the rigidity of the Mast. For this I have designed a special Olympic Sleeve that can slide onto the Mast and hold a weight plate or two firmly in place. One or even two weight plates can greatly enhance the performance of your cobra bag because they brace the Mast at a much higher point.
Make sure to check out my YouTube channel for more tips and ideas, as well as training videos and latest add-ons. I hope you enjoy the Kewlus cobra bag, and if you have any questions, you can ask Tim (bottom right) or use the Contact Page to get in touch with me.